Spring Boot Introduction
Spring Boot makes it easy to create stand-alone, production-grade Spring based Applications that you can “just run”. Spring Boot takes an opinionated view of building production-ready Spring applications. Favors convention over configuration and is designed to get you up and running as quickly as possible.
Incremental Example
开发过程对比
原生开发 SpringMVC 程序过程
SpringMVC Example依赖最基本的 API

WEB 3.0 的配置类
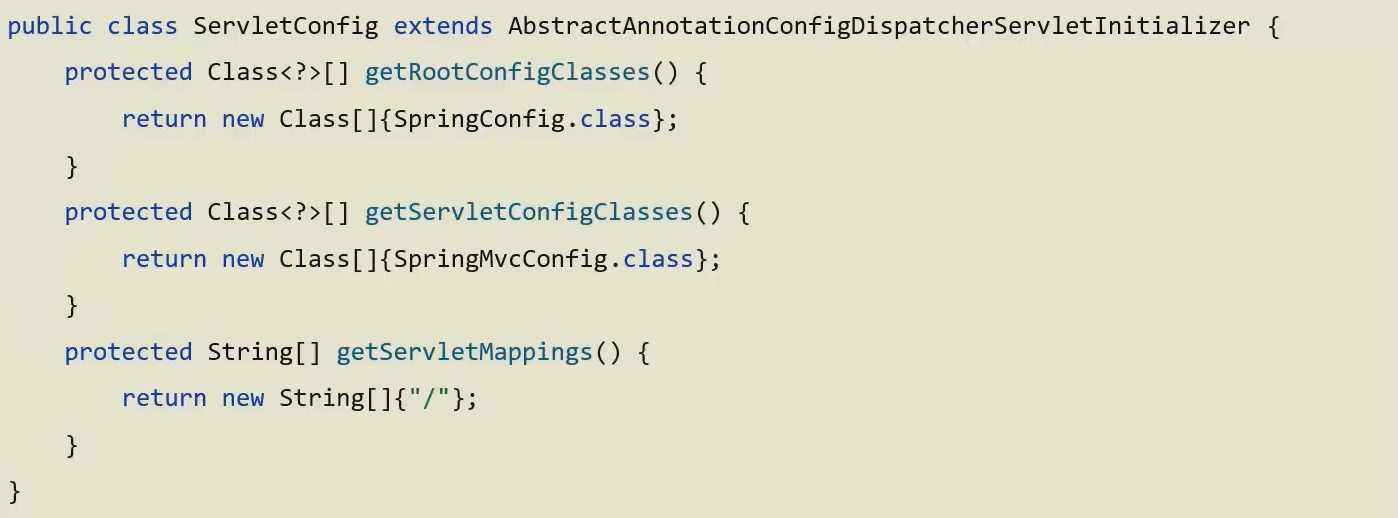
Spring 的配置类

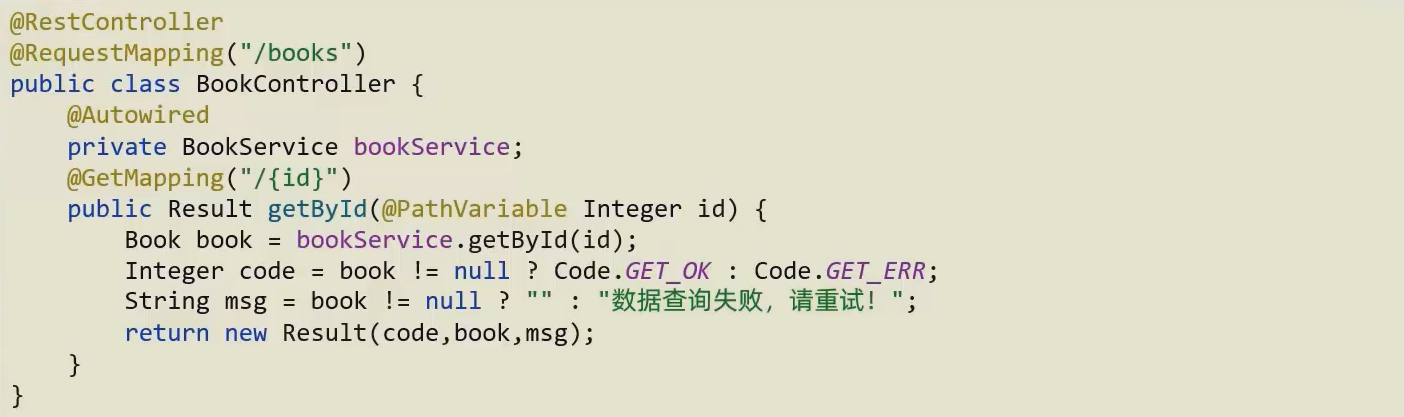
开发 Controller 类
Spring boot 开发程序过程
Spring Boot ExampleSpring Initializr 创建项目
开发 Controller 类。运行自动生成的 Application 类
程序对比
Spring 程序与 SpringBoot 程序对比
| 类 / 配置文件 | Spring | SpringBoot |
|---|---|---|
| pom 坐标 | 手工添加 | 勾选添加 |
| web 3.0 配置类 | 手工制作 | 无 |
| Spring / SpringMVC 配置类 | 手工制作 | 无 |
| 控制器 | 手工制作 | 手工制作 |
项目快速启动
第一步:对 Boot 项目打包,执行 Maven 构建指令 package
第二步:执行启动指令
java -jar springboot.jar

SpringBoot Introduction
- 用来简化 Spring 应用的初始搭建以及开发过程
- Spring 程序缺点:
- 配置繁琐
- 依赖设置繁琐
- SpringBoot 程序优点:
- 自动配置
- 起步依赖(简化依赖配置)
- 辅助功能(内置服务器)
起步依赖
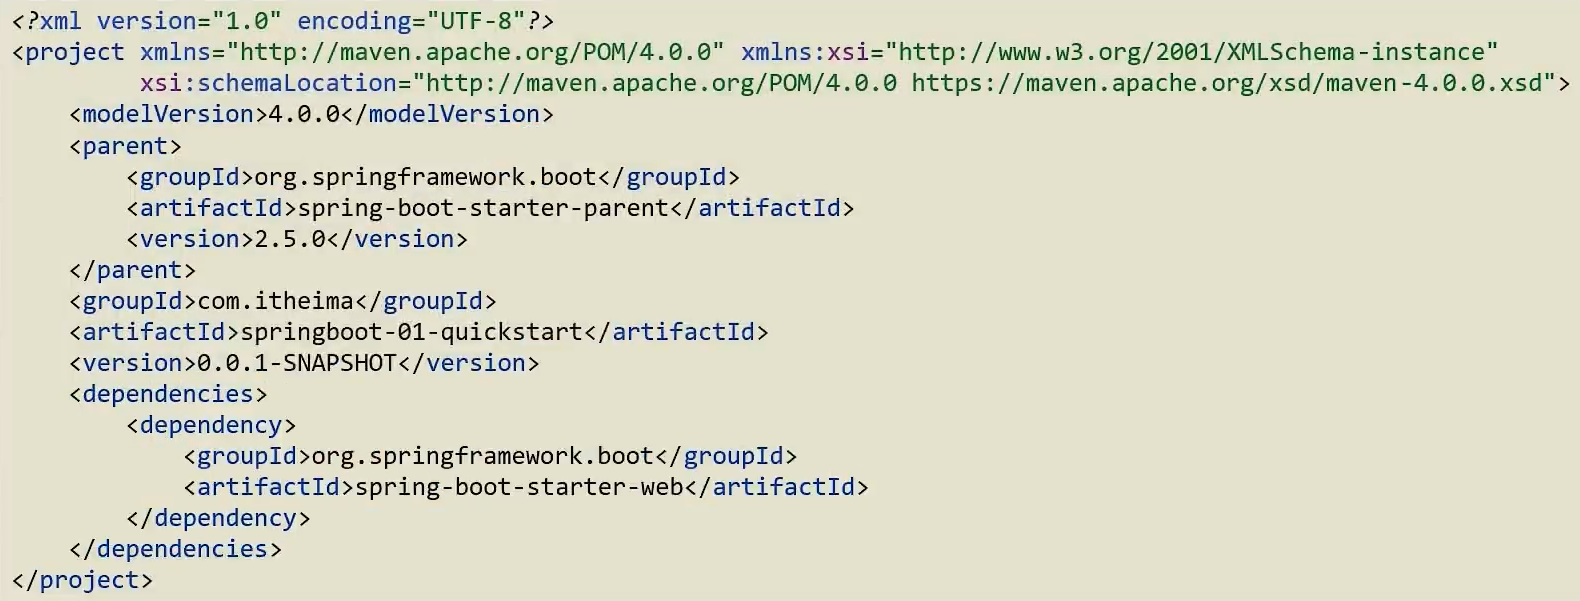
- starter
- SpringBot 中常见项目名称,定义了当前项目使用的所有项目坐标,以达到减少依赖配置的目的
- parent
- 所有 SpringBoot 项目要继承的项目,定义了若干个坐标版本号(依赖管理,而非依赖),以达到减少依赖冲突的目的
- spring-boot-starter-parent(2.5.0)与spring-boot-starter-parent(2.4.6)共计 57 处坐标版本不同
- 实际开发
- 使用任意坐标时,仅书写GAV中的G和A,V由SpringBoot提供
- 如发生坐标错误,再指定version(要小心版本冲突)
辅助功能
- spring-boot-starter-web
启动方式
- SpringBoot 在创建项目时,采用 jar 的打包方式
- SpringBoot 的引导类是项目的入口,运行 main 方法就可以启动项目
更改起步依赖
使用 maven 变更起步依赖
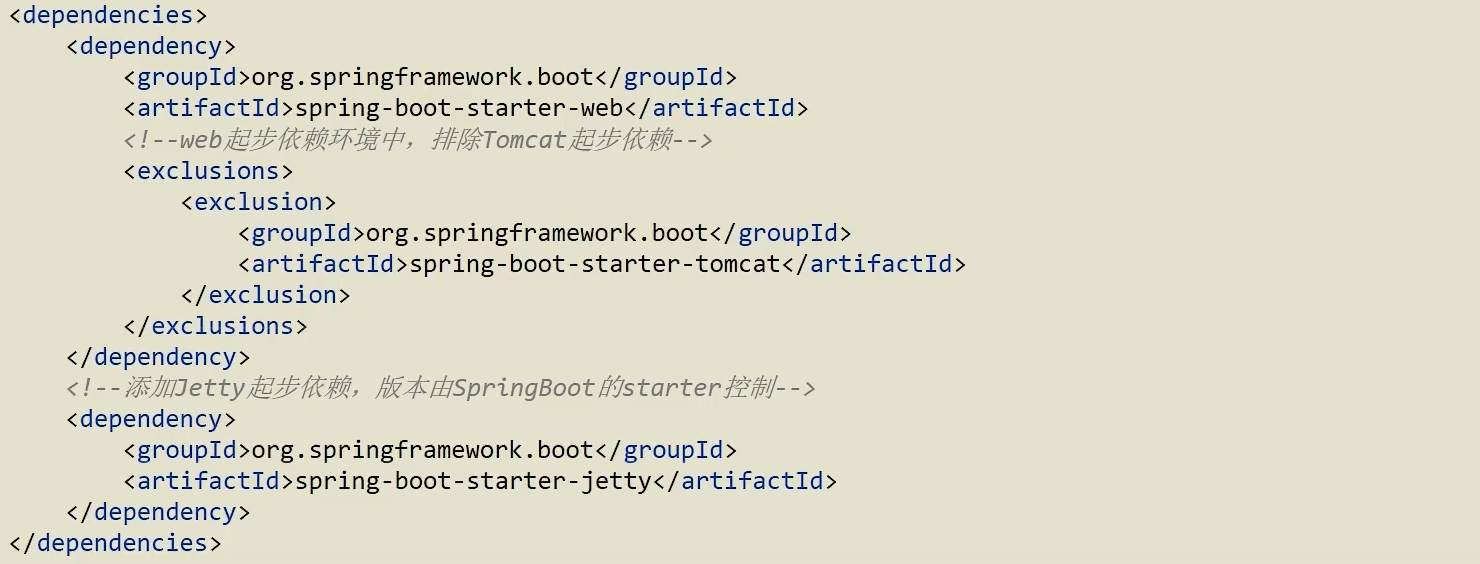
Jetty 比 Tomcat 更轻量级,可扩展性更强(相较于 Tomcat),谷歌应用引擎 GAE 切换为 Jetty
基础配置
配置格式
SpringBoot 提供了多种属性配置方式
application.properties
server.port=80application.yml
server: port: 81application.yaml
server:
	port: 82
SpringBoot 配置文件加载顺序
- application.properties > application.yml > application.yaml

yaml 语法规则
- 大小写敏感
- 属性层级关系使用多行描述,每行结尾使用冒号结束
- 使用缩进表示层级关系,同层级左则对齐,只充许使用空格(不充许使用Tab键)
- 属性值前面添加空格(属性名与属性值之间使用冒号+空格作为分隔)
#表示注释- 数组数据在数据书写位置的下方使用减号作为数据开始符号,每行书写一个数据,减号与数据间空格分隔
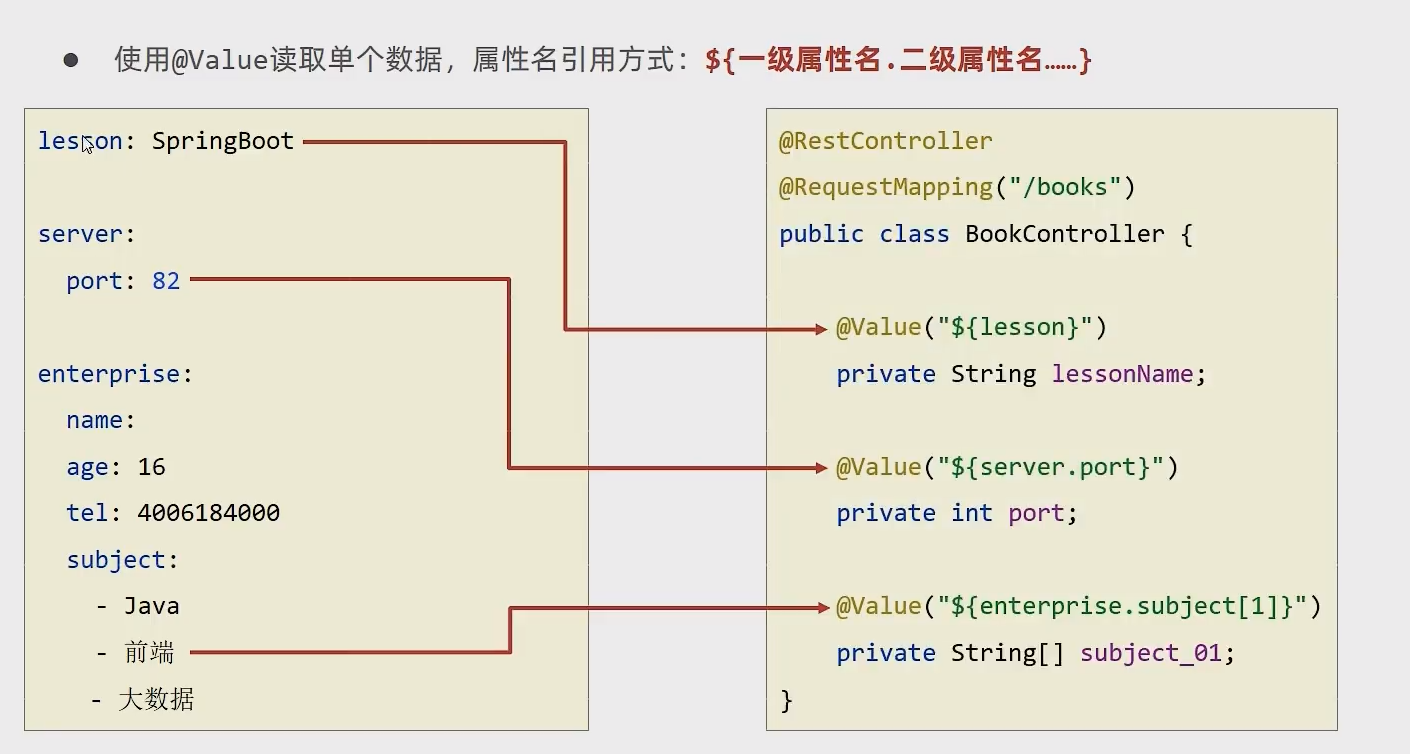
yaml 数据读取
- @Value 直接读取
- Environment 封装后读取

- 实体类封装属性,封装后读取

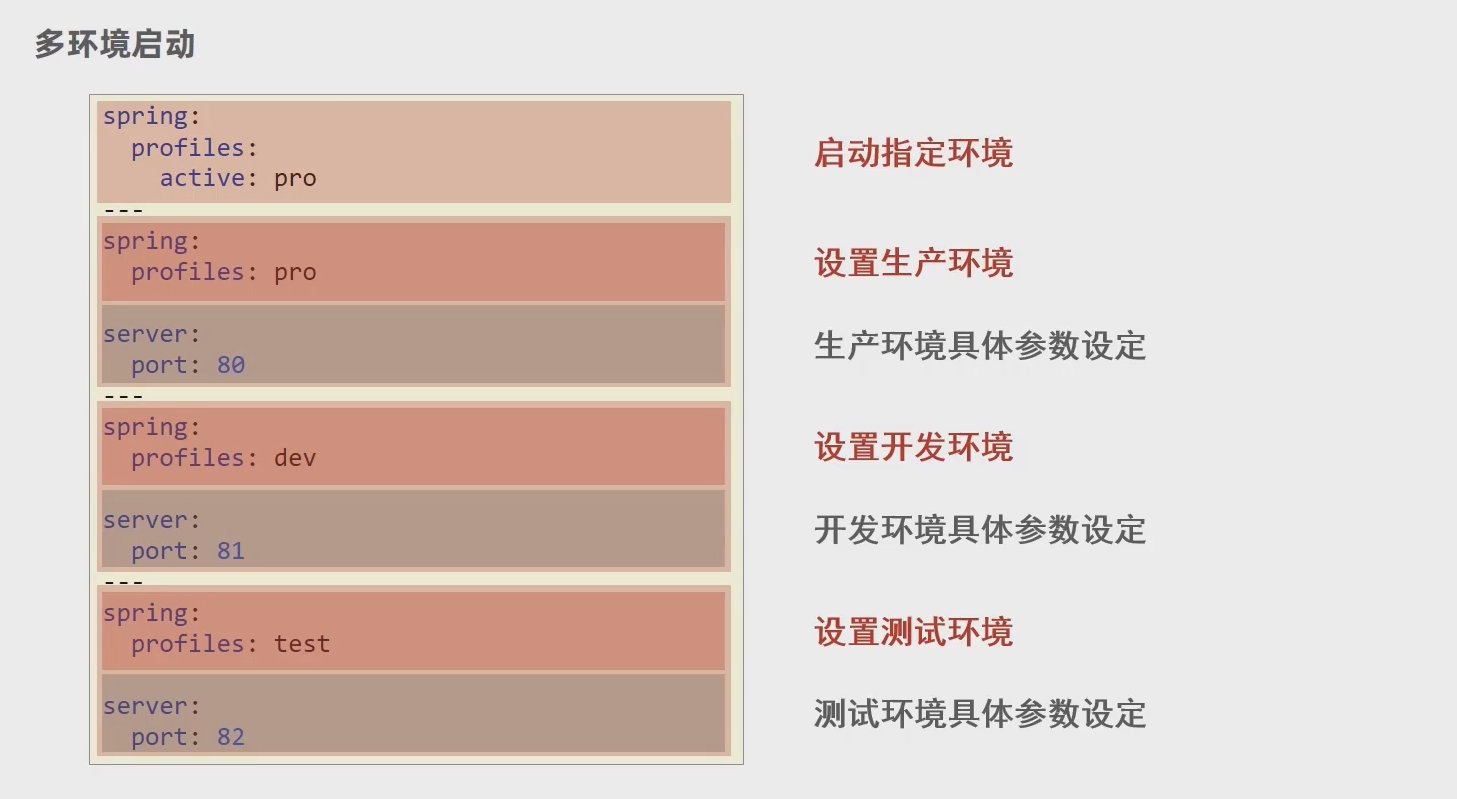
多环境启动
- 使用 application.yml 文件多环境启动
- 使用 properties 文件多环境启动

多环境启动命令格式
带参数启动 SpringBoot
java -jar springboot.jar --spring.profiles.active=testjava -jar springboot.jar --server.port=88java -jar springboot.jar --spring.profiles.active=test --server.port=88
启动加载配置顺序
启动加载配置优先级,从低到高
- Default properties (specified by setting
SpringApplication.setDefaultProperties). @PropertySourceannotations on your@Configurationclasses. Please note that such property sources are not added to theEnvironmentuntil the application context is being refreshed. This is too late to configure certain properties such aslogging.*andspring.main.*which are read before refresh begins.- Config data (such as
application.propertiesfiles). - A
RandomValuePropertySourcethat has properties only inrandom.*. - OS environment variables.
- Java System properties (
System.getProperties()). - JNDI attributes from
java:comp/env. ServletContextinit parameters.ServletConfiginit parameters.- Properties from
SPRING_APPLICATION_JSON(inline JSON embedded in an environment variable or system property). - Command line arguments.
propertiesattribute on your tests. Available on@SpringBootTestand the test annotations for testing a particular slice of your application.@DynamicPropertySourceannotations in your tests.@TestPropertySourceannotations on your tests.- Devtools global settings properties in the
$HOME/.config/spring-bootdirectory when devtools is active.
多环境开发控制
- Maven 主导工程,生成 jar 包
- SpringBoot 是在 Maven 打包过程中作为一个工具
- 版本控制 Maven 为主,SpringBoot 为辅助

Maven 与 SpringBoot 多环境兼容
Maven 中设置多环境属性
<profiles>
    <profile>
        <id>dev_env</id>
        <properties>
            <profile.active>dev</profile.active>
        </properties>
        <activation>
            <activeByDefault>true</activeByDefault>
        </activation>
    </profile>
    <profile>
        <id>pro_env</id>
        <properties>
            <profile.active>pro</profile.active>
        </properties>
    </profile>
    <profile>
        <id>test_env</id>
        <properties>
            <profile.active>test</profile.active>
        </properties>
    </profile>
</profiles>
SpringBoot 中引用 Maven 属性
spring:
  profiles:
    active: ${profile.active}
---
spring:
  profiles: pro
server:
  port: 80
---
spring:
  profiles: dev
server:
  port: 81
---
spring:
  profiles: test
server:
  port: 82
对资源文件开启对默认占位符的解析
<build>
    <plugins>
        <plugin>
            <artifactId>maven-resources-plugin</artifactId>
            <configuration>
                <encoding>utf-8</encoding>
                <useDefaultDelimiters>true</useDefaultDelimiters>
            </configuration>
        </plugin>
    </plugins>
</build>
Maven Package 打包
配置文件分类
问题:当使用
java -jar springboot.jar --spring.profiles.active=test --server.port=88临时管理配置时,配置过多不好管理SpringBoot 中四级配置文件(生效优先级从高到低)
- 1级: 生成 JAR 包的路径 file: config/application.yml
- 2级: 生成 JAR 包的路径 file: application.yml
- 3级: 开发项目中路径 classpath: config/application.yml
- 4级: 开发项目中路径 classpath: application.yml
作用
- 1级与2级作为系统打包后设置通用属性
- 3级与4级用于系统开发阶段设置通用属性
Integrating JUnit
整合 JUnit 对比
Spring 整合 JUnit
Spring Integrating JUnit
SpringBoot 整合 JUnit
SpringBoot Integrating JUnit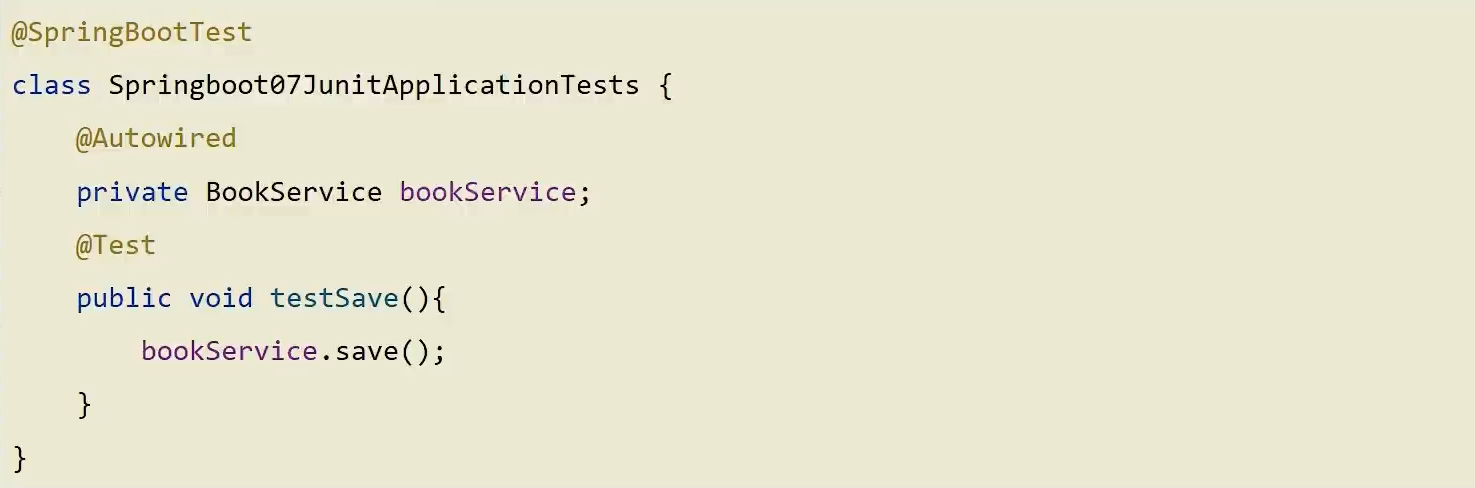
注意事项
如果测试类在 SpringBoot 启动类的包或子包中,可以省略启动类的设置,也就是省略 classes 的设定
Integrating SSM
- SpringBoot 整合 Spring(不存在)
- SpringBoot 整合 SpringMVC(不存在)
- SpringBoot 整合 MyBatis(主要)
整合 MyBatis 对比
Spring 整合 MyBatis
Spring Integrating MyBatisSpringConfig
- 导入 JdbcConfig
- 导入 MyBatisConfig
@configuration
@ComponentScan("com.jerry")
@PropertySource("classpath:jdbc.properties")
@Import({JdbcConfig.class,MyBatisConfig.class})
public class SpringConfig{
}
JDBCConfig
定义数据源(加载 properties)
public class JdbcConfig{
    @Value("$(jdbc.driver)")
    private String drive;
    @Value("$(jdbc.url)")
    private String url;
    @Value("$(jdbc.username)")
    private String userName;
    @Value("$(jdbc.passwordy")
    private String password;
    @Bean
    public DataSource getDataSource(){
        DruidDataSource ds = new DruidDataSource();
        ds.setDriverClassName(driver);
        ds.setUrl(url);
        ds.setUsername(userName);
        ds.setPassword(password);
        return ds;
    }
}
定义配置信息(yml 或者 properties 文件)
jdbc.driver=com.mysql.jdbc.Driver
jdbc.url=
jdbc.username=
jdbc.password=
MybatisConfig
定义 SqlSessionFactoryBean
@Bean
public SqlSessionFactoryBean getSqlSessionFactoryBean(DataSource dataSource){
    SqlSessionFactoryBean ssfb = new SqlSessionFactoryBean();
    ssfb.setTypeAliasesPackage("com.jerry.domain");
    ssfb.setDataSource(dataSource);
    return ssfb;
}
定义映射配置
@Bean
public MapperScannerConfigurer getMapperScannerConfigurer(){
    MapperScannerConfigurer msc = new MapperScannerConfigurer();
    msc.setBasePackage("com.jerry.dao");
    return msc;
}
SpringBoot 整合 MyBatis
SpringBoot Integrating MyBatis第一步:创建新模块,选择 Spring 初始化,配置基础信息
第二步:选择当前模块需要使用的技术(MyBatis、MySQL)
第三步:设置数据源参数
spring:
	datasource:
		type: com.alibaba.druid.pool.DruidDataSource
		driver-class-name: com.mysql.cj.jdbc.Driver
		url: jdbc:mysql://localhost:33o6/ssm_db
		username: root
		password: root
第四步:定义数据层接口与映射配置
//com.jerry.dao.bookDao
@Mapper
public interface BookDao{
    @Select("select * from book where id = #{id}")
    public Book getById(Integer id);
}
第五步:测试类中注入 dao 接口
@SpringBootTest
class SpringbootMybatisApplicationTests{
    @Autowired
    private BookDao bookDao;
    @Test
    public void testGetById(){
        Bookbook=bookDao.getById(1);
        System.out.println(book);
    }
}